Posted by: Jemery | June 15, 2009

Coax Cable Vertical CB Antennas

For a quickie CB antenna, a vertical dipole (1/2) wave can be made right from the coax itself You take your coax and very carefully, without nicking the braided shield, strip 102 inches of the outer insulation jacket off one end. After removing the outer jacket, start bunching the shield down the coax from the end. Now, where the outer jacket and the shield meet, separate the braided shield enough to get the inner conductor out through the hole in the braid. Pull all of the inner conductor through and stretch it and the braid out. Be careful not to skin any of the insulation off the inner conductor. Now attach an antenna insulator to the end of the inner conductor. Measure the braided shield. Cut it off at about 106″ and attach an antenna insulator to the end. The total length of the inner and outer conductor should be about 17 feet (1/2 wave). You can haul it up to any height you want with a string or rope attached to the insulator on the center conductor. It’s a good idea to coat the end of the coax cable where it separates with some kind of waterproof sealer. This keeps water from seeping into the coax, which could cause a high SWR.

Just attach a coax connector on the end of the coax going to your transceiver and you are on the air. The SWR should be 1.5 or better, if cut to the proper length. It’ll get out about as good as a ¼ wave ground plane CB radio antenna if you get it up high and in the clear. Do not hoist this antenna up next to a metal pole, because the metal will interfere with the antenna’s operation and cause a high SWR.

Posted by: Jemery | May 5, 2008

VHF and UHF Bands

On VHF and UHF mobile radio bands, the whips are so short that they may be phased vertically in a collinear array to achieve increased gain on transmit and receive. Why send half your signal into the sky when it can do more good down close to the horizon? You can spot a VHF or UHF collinear high-gain antenna by the loading coils in the center of the whip.

For VHF operation, a 5/8-wavelength CB antenna offers a low take-off angle and may achieve increased gain of approximately 3dB over a conventional 18″ spike on the roof. You can spot these antennas easily by a single yard-long whip and a gray or stainless steel loading coil at the base.

For UHF operation at 400-500 MHz, a popular mobile CB Antenna is the collinear halfwave-over-halfwave whip. It’s about 20″ tall with a sealed phasing coil in the center, and offers increased gain over a little 611 spike. A car with one installed on the roof usually will still fit into a residential garage.

Posted by: Jemery | April 2, 2008

How to adjust SWR on your CB radio.

Equipment needed: SWR meter, short jumper coax 3 foot.

Procedure:   The SWR meter needs to be placed in line between the antenna and the CB. Connect the antenna (normally connected to the back of the CB ) to the connector marked “Antenna” or “Ant”  on your SWR Meter. Connect one end of the short jumper coax to the “transmit” or “Xmit” on the SWR meter. Connect the other end of your jumper coax to the CB.

Assuming you have a standard SWR meter the switches should read as follows: REF or SWR, FWD, and there should be a slide switch marked “set” or “Adjust”. If different consult your meter’s owners manual.

With the radio on the lowest channel (1 on CB) and the SWR meters switch in the Forward (FWD) position, depress the transmit switch (key up) located on the microphone. While holding the unit in this transmit mode, adjust the meter needle to the set position using the Set or Adjust knob on the meter. As soon as the needle is in alignment with the corresponding mark on the meter face, flip the switch to the Reference (REF) position. The meter is now showing your SWR on channel one. Note the value and quickly release the microphone switch. Record this reading.

Repeat the previous step on channels 19 and 40.

How to read your results:  If SWR on channels 1, 19 & 40 is below 2.0, your radio can be operated safely.

If SWR on all channels is above 2.0 but not in the “red zone” (normally over 3.0), you may be experiencing coaxial cable reaction (bad quality, wrong length, etc.), insufficient ground plane, or have an ungrounded antenna mount.

If SWR is in the “red zone” on all channels, you probably have an electrical short in your coax connectors, or your mounting stud was installed incorrectly and is shorted. Do not operate your radio until the problem is found, serious damage can occur to your radio.

If SWR on the lowest channel is higher than it is on the highest channel, your antenna system appears to be electrically short. Your antenna length may need to be increased.

If the SWR on channel 40 is greater than that on channel 1, your antenna is considered to be “LONG” and reduction of physical height and/or conductor length will correct this situation.

Posted by: Jemery | February 13, 2008

Common Causes of High SWR

There are many things other than the antenna that can cause high SWR. SWR meter readings take into consideration the antenna, the coaxial cable, the mount, the mounting location, the vehicle and objects in the antennas near-field environment. We broke our list of common high SWR causes into six primary categories. The order of the categories does not imply that one is more common than the other, however, the list within each category is arranged based upon our experience and shows the most common causes higher on the list than the lesser common causes.

ANTENNA RELATED

  • Antenna was not tuned in its final mounting location
  • Antenna tip installed AFTER the antenna was tuned
  • Testing or tuning with doors, hood or trunk open (altered ground plane)
  • Antenna not mounted vertically
  • Incompatibility between antenna and vehicle for undetermined reasons
  • Insufficient tuning range due to antenna/installation incompatibility
  • Antenna tested/tuned inside garage, carport, etc.
  • Antenna was tuned then moved to another mounting location or vehicle>
  • Ground plane and no-ground plane antennas used with wrong coax cable type
  • Antenna grounded to vehicle chassis ground circuit
  • Internal antenna issue (verify base to tip continuity)
  • Antenna not designed for use with CB radio

ANTENNA MOUNT

  • Ungrounded mount (re: ground plane dependent antenna system only)
  • Relying on a chassis ground via the radio (must test with coax off of radio)
  • Anodized or powder coated mounts (insulated from chassis ground)
  • Antenna stud mount improperly installed (shorted)
  • Coax shield side not grounding to mount (re: ground plane dependent antenna system only)
  • Improper positioning of required insulators on antenna stud

COAXIAL CABLE

  • Open (broken) center conductor or shield
  • Center conductor to shield short (undesirable connection)
  • Severe pinches, sharp bends, and/or cuts in outer jacket of coax
  • Excess coax rolled into a coil for stowing.
  • Low quality coax cable
  • Antenna/Counterpoise anomolies and potential coax cable resonance
  • Wrong type of coax (Use ONLY 50-ohm for single antennas, 75-ohm for duals)
  • Using a standard antenna with a no-ground-plane cable assembly or vice versa

MOUNTING LOCATION

  • Antenna running parallel to reflective surface over too much of its length (and too close)
  • Antenna mount affixed to an ungrounded in-bed pickup toolbox
  • Antenna mount affixed to insulated roof rack (anodized or powder coated)
  • Antenna mount affixed to an ungrounded spare tire swing arm
  • Antenna mounted too close to other antennas (24″ minimum recommended)
  • Less than 60% of a top loaded antenna in free air-space
  • Dual antennas not having unobstructed line-of-sight between top 60% of length

GROUND PLANE (COUNTERPOISE)

  • Vehicle is a composite material (fiberglass) – NGP system required.
  • Insufficient ground plane size (motorcycles, ATV’s, etc)
  • Running too long of a wire from mount to chassis to ground the mount
  • Thin sheet aluminum vehicle shell (insufficient metal mass)
  • Antenna positioned in a manner that doesn’t allow it to use available metal counterpoise

SWR METER

  • “To Transmitter” and “To Antenna” coax leads reversed
  • Failure to recalibrate SWR meter after every channel change
  • Calibrating meter when in SWR/Ref mode instead of Cal/Fwd mode
  • Innaccurate, defective or uncalibrated SWR meter
  • Unable to calibrate meter to set line (radio output power issue)
  • Improper testing procedure
  • Faulty coaxial jumper between radio and SWR meter

CB RADIO

  • Defective/damaged transceiver (radio)
  • Insufficient current to transmitter is limiting output
  • High resistance 12v power connection
  • Partially broken wire on either positive or negative 12v lead
  • Loose connection on either positive of negative 12v lead
  • Corroded power lead on either positive or negative 12v wire

Bincang di: Group CB

Posted by: Jemery | July 17, 2007

Ranger TR-696M

TR-696M

Features

  • Analog S/RF meter indicates Receive Signal Strength, RF Power Output and SWR Level
  • Noise Blanker/Automatic Noise Limiter
  • Red/Green LED indicator for TX/RX
  • Mic Gain/RF Gain Control
  • Public Address Capability
  • Pre-wired for external frequency counter
  • 4 watts AM/FM and 12 watts SSB Power Output
  • +/- 1.5 KHz Clarifier Control
  • Instant Channel 19 Access

Specification

General

  • Frequency Range 26.965 – 27.405 MHz
  • Channels 40 AM, 40 FM, 40 LSB, 40 USB
  • Frequency Control Phase-Locked-Loop (PLL) Synthesizer
  • Frequency Stability 0.001 %
  • Operating Temperature Range -20°C to +50°C
  • Input Voltage 13.8 VDC +/- 15%
  • Antenna Impedance 50 Ohms
  • Size (LxWxH) 234.7 x 200 x 60 mm
  • Weight 2.8 kg
  • Speaker Impedance 8 Ohms
  • Antenna Connector UHF, S0239
  • FCC ID M38-TR-696 (without FM mode)
  • Malaysia Sirim Approved RAAK/02A/1100/M
  • PA Output Power 4 watts

Transmitter

  • RF Power Output AM/FM : 4W, SSB : 12W/25W (optional)
  • Frequency Tolerance 0.005 %
  • Carrier Supression -55 dB
  • Spurious Emission -55 dB
  • Audio Distortion 10 %
  • Frequency Response 300 to 2500 Hz
  • Microphone Dynamic

Receiver

  • Sensitivity for 10dB SINAD AM/FM : 0.5 uV, SSB : 0.25 uV
  • Squelch Sensitivity Adjustable, less than 0.25 uV
  • Image Rejection more than 65 dB
  • Audio Power Output 2W @ 10 % distortion
  • AGC figure of Merit 100 mv for 10 dB change in audio output
  • Audio response 300 to 2500 Hz
  • Clarifier Range 1.5KHz +/- 0.5
Posted by: Jemery | June 25, 2007

¼ Wave Ground Plane CB Antenna

¼ Wave Ground Plane CB Antenna


1/4 Wave Ground Plane CB Antenna

This CB antenna consists of a driven element and four radial wires that act as a ground. The driven element receives the transmit energy from the rig.

Parts List

1.  104″ (264 cm.) [I 02′ (259 cm.)] piece of aluminum pipe or conduit
2.  ¾” – 1″ diameter
3.  Two U-bolts, same size as pipe
4.  One sheet metal screw
5.  One J-hook
6.  Four “egg” ceramic insulators
7.  408″ (10.22 m.)[400′”(10.2 m.)] of 16 gauge wire
8.  Rope, enough to guy the ground radial, depending on the height of the antenna
9.  A couple of two-by-fours
10. Electrical tape
11. Silicone sealer to cover coax connection

The inside conductor of the coax is connected to the aluminum pipe by means of a screw into the bottom of the pipe. See the detail drawing on this page. Coat this connection with sealer or cover it with tape to protect it from corrosion.

All vertical antennas need to be grounded in some way. A mobile CB antenna uses the car body as the ground. On this CB Antenna, the four radial wires are used as the ground. This is called the ground plane of the antenna.

The braided wire which forms the outside conductor of the coax is soldered to all four radial wires. The wires must be exactly 264 cm (104′) long [259 cm(102″) long] (¼ wavelength).

Remember that the inner conductor and outer braid of the coax must not touch each other, nor can the radials come in contact with the driven element. The radials slope down at about a 45 degree angle in different directions, and are tied to the insulators. Rope or nylon cord is then tied to the insulators and used to hold the radials out. They can be attached to anywhere convenient; trees, a fence, house, etc.

If you are short on room for such a radial system, you can use 104″ (radials) and 102″ (driven elements) pieces of aluminum tubing, or suspend the wires on PVC pipe, bamboo, or 1″ x 2″‘ wooden sticks. It’s a must to check the SWR when done. It should be lower than 2, and ideally lower than 1.5 or 1.3.

A ¼ wave ground plane CB antenna made from wire can be suspended from a tree. We have talked to stations over 40 miles away using this antenna up about 30 feet high, running a mobile rig for a base.

Posted by: Jemery | June 24, 2007

Antnna SWR

5/8 Wave CB Antenna

This is an easy antenna to build and find the parts for. If you follow these instructions and have it come out looking like these pictures, it should have a very low SWR and appreciable gain.

You can use any number of pieces of aluminum pipe so long as they are ridged and fairly thick-walled so as not to become bent and broken in a strong wind. The pieces should be gradually smaller, one being able to fit inside the next. Cut two 2′ grooves with a hacksaw down the outer pieces of aluminum and put a hose clamp around them. Now adjust the antenna to 22 ½ feet (6.85 meters) and tighten the hose clamps down to hold it all together. This 22 ½-foot vertical element can now be mounted with two U-bolts on to the 2″ x 6′ board. This board should be treated or painted to protect it from the weather.

Put a bolt through the piece of wood a few inches below the vertical element. Here you should fasten one end of the 6 foot (183 centimeters) piece of copper wire or tubing, the outside braid of the coax and each of the 104″ (264 cm)[102″ (259 cm)] long, stranded wires. These are called the ground radials and should be tied off with string (not wire) at a 45 degree angle away from the bolt. The ground radials and the braid from the coax can be soldered together or can be crimped together with a crimp connector that fits the bolt. The other end of the 6′ copper wire is bent and fastened to the vertical element. The end of the center wire of the coax is then twisted onto this in such a way that it ca be slid up or down along the copper wire and soldered after adjustment.

Audit je la. The success of all receiving operation, regardless of frequency or application, can be defined as the pursuit of a single goal maximum signal to noise ratio. The larger the signal and the lower the offending background noise the better the reception.

Unfortunately, the strength of the received signal is, for the most part, a fixed quantity. With the antenna and receiver in use not. much can be done to improve. the delicate balance between signal strength and atmospheric noise.

But there is another type of noise that is all-too-common in the modern receiver setup, and it may be described as environmental noise. This is a type of noise that is usually wide spectrum, amplitude modulated (AM), and locally generated. It is especially a problem of the modern computerized world. Environmental noise is caused by local arcing connections of AC power lines, computer “hash” type noise emitted by typewriters, fax machines, television sets, VCRs, heating & cooling systems, and just about anything else electric in the home or office. Most of the noises do not travel a great distance but can cause harmful effects to radio reception and can be difficult to find and correct.

We have seen many sad cases of environmental noise. Station owners purchase expensive, delicate receiving equipment costing thousands of dollars and then suffer poor performance because of local noise generated on their own property or from a nearby source. So here’s a simple, almost cost free method of hunting down these insidious noise gremlins. It’s cheap, easy, and you may even enjoy the “hunt”.

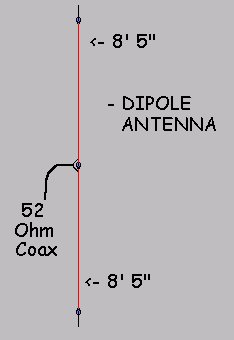
Put a PL259 or other connector on about 50 feet of RG58 coaxial cable. On the other end of the cable fray back the ends, cut back the shield, and attach about, 18″ of wire to the center conductor (clip-leads work well). What you have created is a simple sensing antenna. Connect the cable end with the connector to a receiver that covers the 25 to 50 Mhz. frequency range, select a clear channel in that spectrum area, and place the receiver in the AM mode. Then move around the house or property with the sensing antenna and listen for noises in the receiver. Moving the sense antenna near electrical appliances will be very educational. It’s almost hard to believe how much noise is generated by the computer in a fax machine or other computerized devices. Also fluorescent lights can be nightmarish! Best bet if you’re a serious listener issue a total ban on fluorescent lightning for as far away as you can dictate or negotiate. Fluorescent lights are based on an arcing principal and are very bad offenders.

Fixing noise problems in your own home or office is usually not difficult. Installing EMI filters on AC power leads of computerized devices ordinarily stops the AC line cord and house wiring from acting like a transmitting antenna for the noise. Commercial telephone RFI filters work well to prevent the same effect from fax machines. Just-about any grounding, shielding, or filtering methods are helpful if you’re-after a secure, noise-free environment. Remember those generated noises only have to transmit the distance between the noisy device and your receiving antenna, and that may be only a few dozen feet!

Power line noises must be repaired by local electric company workers, but most power companies accept noise complaints and deal with them internally. Finding the noise source yourself with an AM radio in your car or handheld unit is a big help to getting quick service. Keep in mind that an arcing high voltage line connection is both a point of power (and revenue) loss for the company as well as a fire and/or service loss hazard. Be sensible-take noise reduction just as seriously as you take receiver choice, antenna choice, or any other facet of good station design.

Posted by: Jemery | June 22, 2007

27 MHZ 1/2 Wave Dipole

27 MHZ 1/2 Wave Dipole

What you will need:

20 feet of 12AWG solid wire.(with or without the insulation)
Some rope.
2 ‘egg’ insulators.(Radio Shack P/N # 271-1234)
A tape ruler, wire cutters, and black electrical tape.
A lenght of coax.(RG-8 RG-58 or RG-8x)
Solder and a good iron.

First you will take the wire and cut two 8 foot 5 inch lenghts.
Next strip 1 inch of the insulation off the end of each wire.
Then cut off about 3 and a half inches of the black insulation from the coax.
Pull the center conductor ,with the foam, threw the braid. Now you should have the coax split in two.
Trim off 1 inch of the foam to expose the center wire of the coax.
Solder one of the 12 gauge wires to the braid and the other to the center conductor.
You can use the tape and wrap it around the solder connections and down the wire a little bit.
This is to keep the water out of the coax. You can also use silicone chaulking if you wish.
Now at the end of the wire ,loop the wire around the egg insulator and wrap it securly so it will not come loose.
Do the same to the other wire.
Now thats it for the antenna all that’s left is to mount it.Use the rope to pull it up into a tree.
After you have it installed and if you find that the S.W.R. is a little high you can lower it and trim off some wire from the ends of the dipole. Cut it in 1/2 inch increments. Remember thats its easier to cut off then it is to put.

Posted by: Jemery | June 20, 2007

Using Highpass Filters For TVI

“AND WHEN NOT TO”

Highpass filters used with modem television receivers are passive devices intended to block the reception of frequencies below 54 Mhz. and allow to pass signals above that frequency. The television range used today extends from 54 Mhz. to 806 Mhz., not inclusive. Cable television frequencies extend from 54 Mhz. to 300 Mhz. in most systems but as high as 500 Mhz. in some of the larger cities with 70 or more channels.

When interference occurs to TV reception it’s important to try to recognize first what the nature of the specific case is and from where it comes. If voice and video distortion both occur and it is believed that a strong local transmitting source -such as a CB or Amateur Radio station is involved then it’s generally pretty easy to determine what to do next. Here’s how.

If the interference occurs to only one TV channel or perhaps two channels spread way apart then the most likely cause is harmonic signal generation from the transmitter source. This type of interference can only be solved, at the transmitter by filtration and it’s not the most common type of malady. A more frequent type of interference is when the local transmitter interrupts the reception of many or all channels, inducing wavy lines or audio noise into the system. This specific case is called fundamental overload and is caused by large signal voltages present in the immediate area.

There are two primary ports of entry that locally generated radio signals can reach and disrupt TV circuitry. The first is through the TV’s antenna or cable line and the second is through the AC power line. Here’s how to tell which case you have. Disconnect the antenna or cable line from the back of the set, and drop it to the floor. Have the station owner transmit again and observe the screen. If interference disappears then you know that the offending signal was entering the, TV through the antenna line and a highpass filter installation is the next step. If interference persists then the AC line is part of the problem and AC line filter may also have to be installed. Either way, a combination of simple disconnection tests can provide a wealth of data from which a solution can be drawn.

Read More…

Older Posts »

Categories